Upcycling Craigslist furniture
Living on a budget can be a challenge, but it’s also actually kind of awesome. When you’re watching every penny, you don’t have the luxury of buying something brand new whenever you need it, so you’re forced to get creative. This where the art of upcycling comes in. Upcycling is taking something old (and perhaps broken) and turning it into something newer and better. If you’ve never tried to repurpose something in this way, you might find the idea to be a little intimidating. But newbies take heart, because what follows are the best tips on how to make that old thing you found on Craigslist into something that’s way fancier (and more deserving of a place in your apartment).
Set your budget before you search. As you’re probably already doing with every other facet of your life, understand how much you can spend on the furniture you need. You don’t necessarily need to have a hard number (as some Craigslist sellers will be willing to negotiate), but it always helps to have a range in mind.
Find a piece with potential. You’re most likely going to need to spend some time on this one, as Craigslist can be a little bit of a letdown sometimes. Keep an open mind, though, as you never know what you might be able to convert into the piece of your dreams. Having the right balance of a critical eye and the ability to know when to dive into the project is key here.
Decide what that piece will turn into. Once you’ve picked up the right piece for the right price, it’s time to figure out the design of the end product. Will you take those doors off? Are you going to install shelves in there? Make a plan and then stick to it as best as you can.
Make the necessary repairs. You may ultimately decide that nothing about your piece is broken enough to need fixing, and that’s fine! But make sure that any and all repairs are made before you go any further in upcycling your piece. The reason for this is simple: you want your furniture to be as finished as possible before putting a new coat of paint or a stain on it. Nicks, scratches, and dings can happen when you’re making repairs, and no one wants to have to do touch up work.
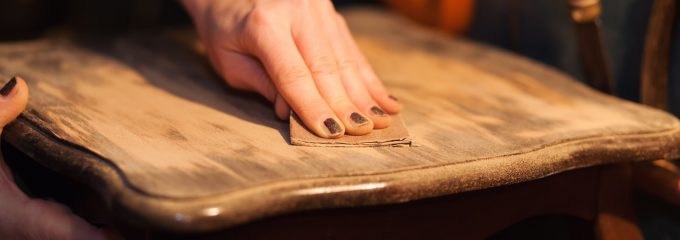
Prime and paint. Once all of your repairs have been made, you can begin the painting process. To ensure that your paint or stain comes out looking as professional as possible, assess whether you need to sand the piece beforehand. Once it’s ready to paint and you’ve masked all the parts you don’t want to get paint on, start with a primer, as this will help your furniture look its best. When that dries, apply as many coats of paint as you need to get the desired look.
Add the necessary accents. Does that dresser drawer need a new handle? Need a design on the surface of that table? Put the finishing touches on your piece. Make it personal so that everyone knows it’s one-of-a-kind, and was transformed by you!
How to Start Furniture Upcycling [Twice Lovely]
Upcycle, Remake, Refinish [DIY Network]